Before you begin
Export a model from Reborn, edit it in Blender, and bring it back as a mod. This walkthrough makes the Buckler 25% taller. Use Blender's built-in glTF tools; you don't need the legacy FATE plugin.
Tested with Reborn 0.3.0 and Blender 5.3.0 on Windows. The finished shield was checked equipped in Grove. Armor, animation, and scene work have extra requirements, covered at the end.
Export from the game#
- Open Mods > Modding Tools > Asset Browser.
- Choose FATE and search for shieldround2. Select ITEMS/shieldround2.MDL to preview the Buckler.
- Check its Export box. Previewing a model doesn't select it for export.
- Choose a new working folder outside your game and installed mods, then click Export selected.
- Check the export report for errors. Open the model's new subfolder and keep reference.glb, reference.json, and README.txt together.
Keep this kit as your untouched reference. Existing kits aren't overwritten. If you use another core, enable it, Apply, and restart before exporting its assets.
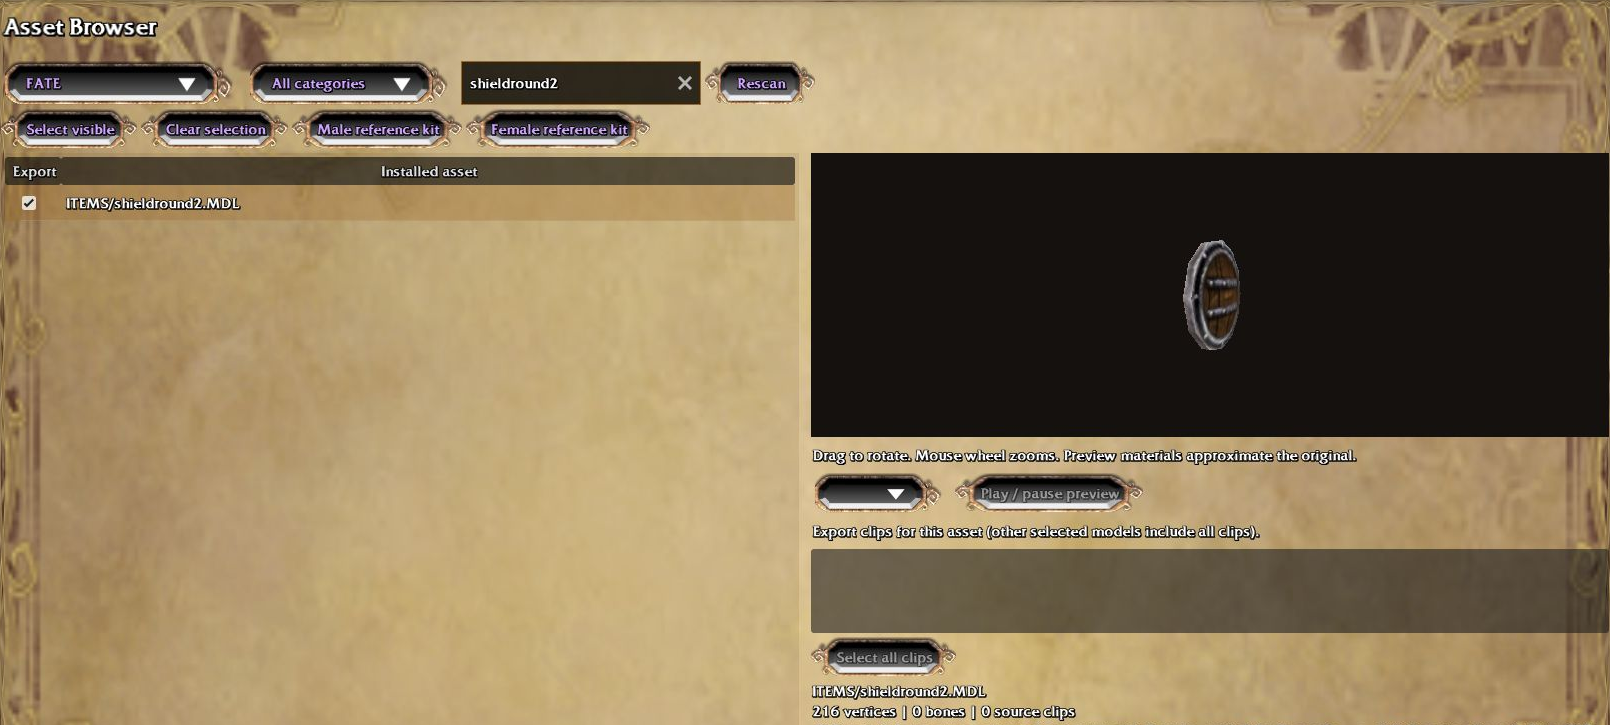
Can't see the search or output controls? Scroll the panel or enlarge the window. If the preview goes blank after resizing, select the model again. The browser previews original assets; check modded models in gameplay.
Edit in Blender#
Start a new Blender file and delete the default cube, camera, and light. Choose File > Import > glTF 2.0 and open reference.glb. Switch to Material Preview and save a separate working .blend file.
Keep the model's origin, object transforms, and attachment alignment. Edit the mesh itself rather than moving or rescaling the whole object.
Make the Buckler taller#
- In Object Mode, select the shield mesh. Use Shift+S > Cursor to Selected to place the 3D Cursor at its origin. Set Transform Pivot Point to 3D Cursor and keep Global orientation.
- Use Numpad 3, or View > Viewpoint > Right, to face the shield.
- Press Tab for Edit Mode, then A to select all vertices.
- Press S, then Z, enter 1.25, and press Enter. The shield is now 25% taller, with the same width and thickness.
- Press Tab to return to Object Mode. Check that the object transforms haven't changed, then save.
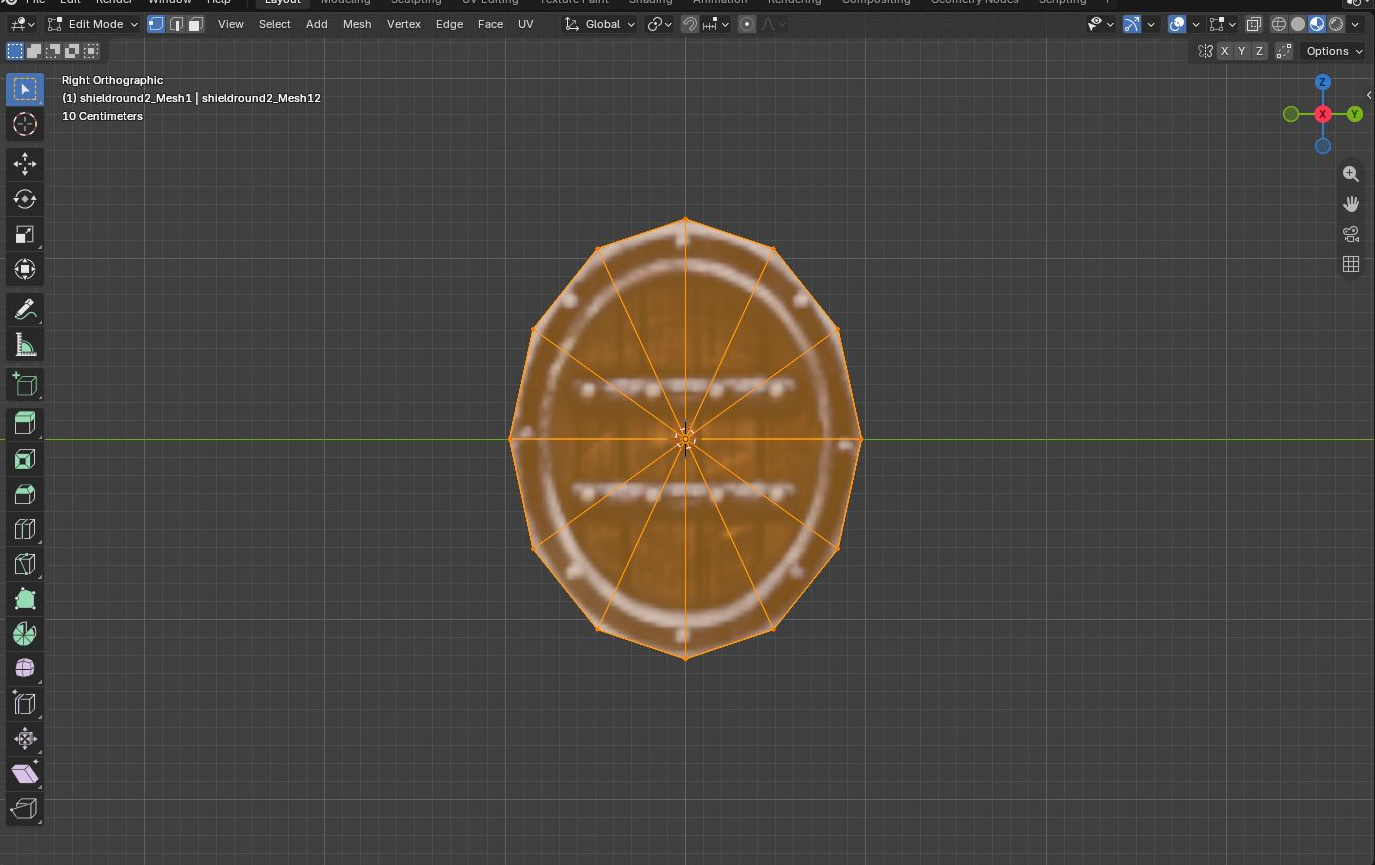
Keep the default glTF axis conversion when exporting. Blender and Reborn use different up axes, but the exporter handles that for you.
Use opaque, nonmetallic base-color materials and UV0 textures. Bake non-white vertex colors into the texture; the Buckler's colors are already white. Blender shader effects won't all carry over.
Export an edited GLB#
- In Object Mode, select only the shield mesh.
- Choose File > Export > glTF 2.0 (.glb/.gltf).
- Set Format to glTF Binary (.glb). Under Include, enable Selected Objects. Leave Cameras and Punctual Lights off.
- Turn Animation off. Keep the default axis conversion and scale.
- Save as Data/Models/my_shield.glb inside a separate mod folder. Keep your .blend file and reference kit outside this folder.
- Import the exported GLB into a new Blender file. Check the shape, origin, texture, and UVs against your edited model.
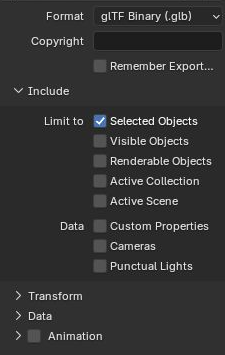
The Buckler kept its taller shape and texture when reimported. Use triangle geometry with embedded buffers and images. This static workflow doesn't support morph targets, transparency, normal/emissive/occlusion/metallic maps, sparse accessors, or unsupported glTF extensions.
See the Blender glTF manual ↗ for more about export options. Labels may differ in newer Blender versions.
Import back as a DAT or asset mod#
Your mod folder should look like this:
MyShield/
  mod.json
  Data/
    Models/
      my_shield.glb
Save this as mod.json:
{
  "schema": 1,
  "id": "example.my_shield",
  "name": "My Shield",
  "author": "Your name",
  "version": "1.0.0",
  "kind": "reborn",
  "api": ">=2.0.0 <3.0.0",
  "game": ">=0.3.0 <0.4.0",
  "content": "Data",
  "targets": ["fate"],
  "model_overrides": {
    "items/shieldround2.mdl": "Models/my_shield.glb"
  }
}
In model_overrides, the left side is the original model path. The right side starts inside the content folder, so Models/my_shield.glb means Data/Models/my_shield.glb here. This replaces the shield's appearance; its stats, collision, and attachment data stay as they were.
- Open Mods > Open Mods folder and copy in the complete MyShield folder, with mod.json directly inside it. Return to Mods and choose Refresh.
- Enable My Shield, choose Apply changes, and choose Restart now when prompted.
- Open Mods again. Select My Shield and check that it says Active now and appears in the Loaded count.
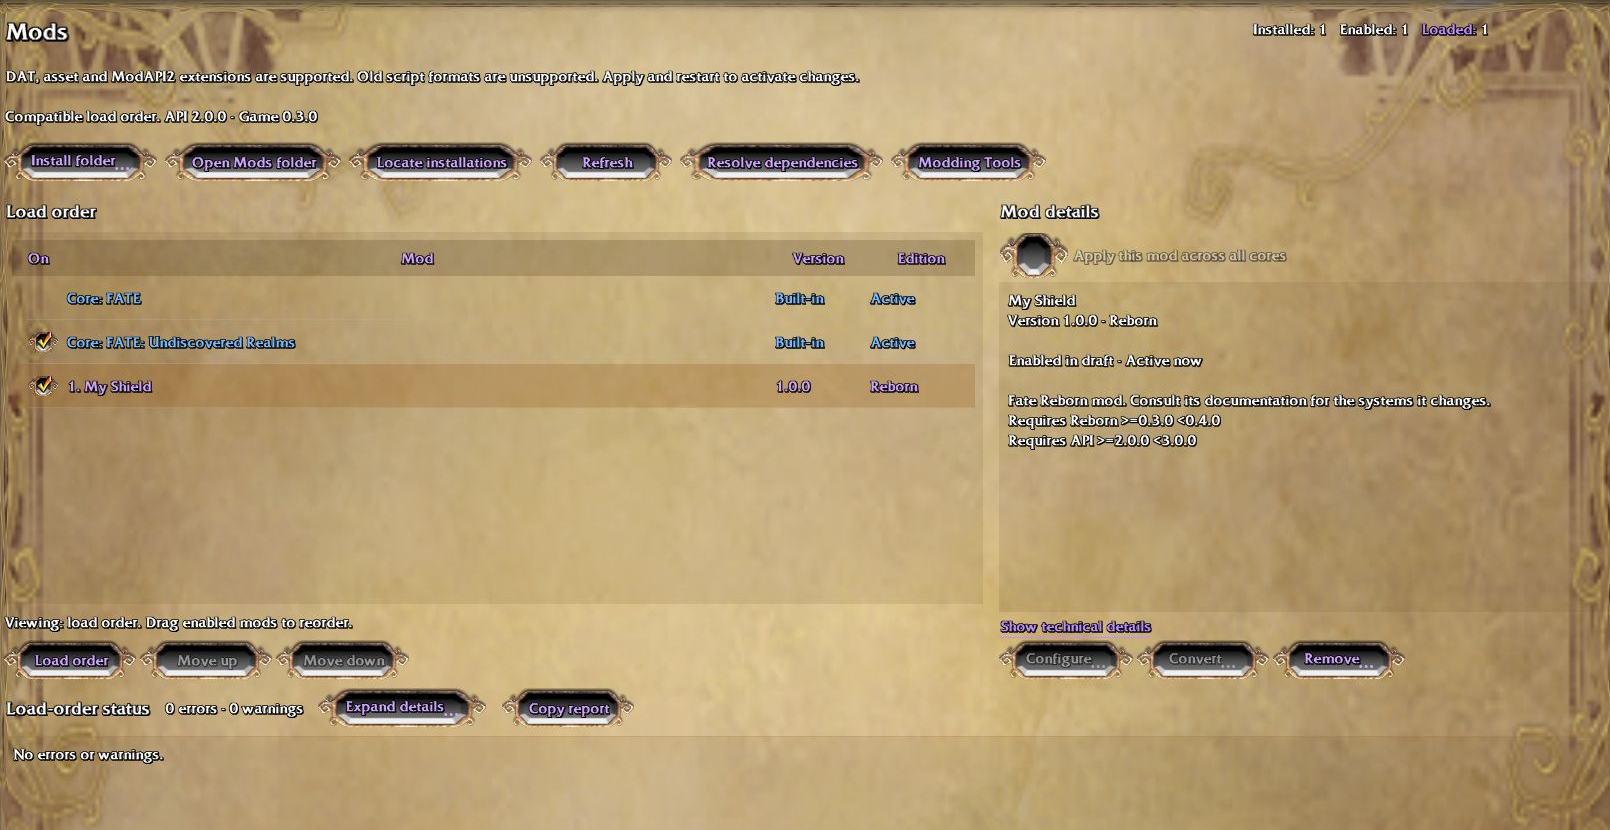
Enlarge the game window if the top-row controls are hidden. You can also use Install folder and select MyShield to copy it into the Mods folder. Keep your working files separately. After further edits, close the game, update the installed GLB, and restart. The running game won't reload it automatically.
Check the actual Buckler in game#
Use a test character, equip a Buckler, and inspect it from several angles. Check its texture and how it sits on the arm while the character moves.
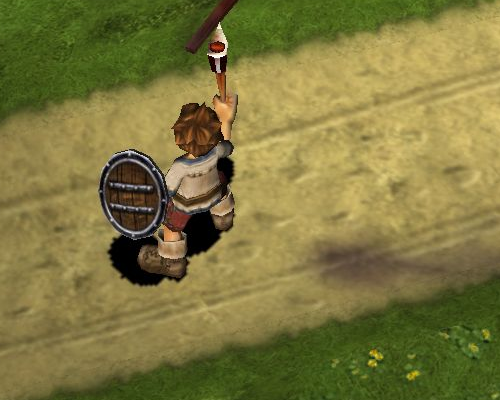
The equipped shield was checked in this test. Its dropped appearance still needs checking before release. Icons, names, stats, and collision need separate changes if you want to alter them.
If the original model still appears#
- Check that the item is a Buckler and the mapping uses items/shieldround2.mdl.
- Check the GLB's path. Don't include Data twice: the mapping is Models/my_shield.glb.
- Update the installed copy, restart, and confirm Active now. Check for another mod replacing the same asset.
- Open the mod diagnostics. Unsupported materials, skins, animations, or external image files can cause Reborn to use the original model instead.
For changes to item data as well, see FATE DAT modding.
Know the supported boundaries#
Start with a static prop, weapon, or shield. Reborn can export compatible MDL, SMS, and standalone SCN geometry, but each type has different import requirements. AMS deformation and COL collision aren't exported.
The Steam zombie and dog currently fail skeletal export checks. Don't remove weights or change rest joints just to get past an error. Exported animation previews also don't mean every creature can be replaced.
Player exports contain separate body parts. Armor needs the matching bones, rest positions, normalized weights, and unchanged object transforms. Keep exposed skin in the section you're replacing, and export the garment with its armature and no animation clips.
Keep original-game reference kits private unless you have permission to share them. Distribute only the finished files your mod needs and that you're allowed to share.
Test coverage and screenshots#
The Buckler test covered export from the released game, mesh editing, GLB export and reimport, mod loading, and the equipped appearance. Copying the package into Data/mods was also checked in a fresh 0.3.0 install. Dropped items, armor, animation overrides, and scene replacements weren't tested in this exercise.
The screenshots show the steps and results. Original FATE artwork belongs to its respective rights holders.
Generate and edit local reference kits#
For other models, select the assets and animation clips you want in the Asset Browser. Drag to orbit the preview and use the mouse wheel to zoom. You don't need Blender or the Godot editor to export a kit.
Keep reference.json with the GLB: it contains metadata that the mesh alone can't preserve. Displayed bone directions are editing aids and may differ from the original rig. Read the export report for errors or any approximations used during conversion.
GLBs can have separate vertices at UV and normal seams. Keep the raw reference before changing topology, weights, or rig data.
Full plate, leather, and black robe have passed export checks. Other assets can still fail; check each export report before editing.
Make armor and animation overrides#
The Buckler walkthrough above is ready to follow with the released game and Blender. Animation has its own tested guide below; armor and scene work still have extra limits.
Armor references#
The Asset Browser can export player body parts and compatible armor for study in Blender. These are separate pieces, rather than a complete equipped character. Male and female rigs can have different bind poses even where bone names match.
This guide doesn't yet provide a verified, complete armor installation workflow for 0.3.0. Exporting or fitting a garment successfully doesn't make it ready to install. Use the static Buckler example for your first playable model replacement.
Animation only packages#
Follow Player animation remapping in Blender to turn Sword_Block into an installable male FATE IDLE replacement. The guide includes a Blender helper and the export, installation, status check, and removal steps tested in Reborn 0.3.0.
This uses a script mod and prepared animation data. Exporting a preview GLB from the Asset Browser doesn't create the runtime package, and this guide doesn't cover legacy DAT/SMA animation export.
Animation replacements keep the game's action duration, hit and cast timing, reach, and cooldowns. Male and female variants need separate preparation; a missing variant keeps its original animation.
Town and dungeon changes#
A visual model won't create collision, navigation, portals, or quests. Town and dungeon changes need their own location, tile, collision, and route data as well as artwork. Treat a scene export as a visual reference, rather than a complete playable location.
No chapters match that search. Try a different word or clear the search.