Before you begin
Use the FATE Blender plugin to edit original MDL models, skinned SMS models, and SCN scenes. The walkthroughs below use plugin 0.0.21 with Blender 5.3.0 on Windows.
The crate and bat examples exported and reimported in Blender. Scene exports lost materials and lighting. These exports haven't been tested in a running game, so keep your originals and read the known issues before replacing anything.
Choose the intended game#
For original FATE, use a tool that exports its native formats. Reborn also supports a newer Blender and GLB workflow, which doesn't require this plugin.
The FATE Blender plugin works with legacy assets. MODKIT 2 is an older option for 3ds Max 7 or 9; it hasn't been tested for this guide.
Keep the correct asset format#
Find the exact model path used by your item or scene. Static models use MDL, skinned models use SMS, and scenes use SCN. A dropped item and its equipped version may use different files.
Export to the required format. Renaming an OBJ, FBX, or GLB file won't convert it.
Keep the model aligned#
Work on copies from your own installation. Keep an untouched model and its textures as a reference.
Preserve the origin, scale, UVs, attachment positions, and rig where present. Changing the appearance won't update collision, item stats, or DAT behavior. Animated models need extra checks for bones, weights, and timing.
Blender plugin walkthrough#
Start with a simple static prop. This example uses PROPS/bigcrate.MDL and crate.png. The crate has no extra light, point, or path data that the exporter could lose.
1 Prepare a working copy#
- Close the game and copy bigcrate.MDL and crate.png into a private working folder, keeping them together.
- Keep an untouched backup and create a separate output folder outside your game installation.
- Record the original path, PROPS/bigcrate.MDL, for installing the replacement later.
The MDL importer looks for textures beside the model and in a sibling TILETEXTURES folder. Copy the required images too. Avoid the anvil or altar for this first exercise: their extra point data is lost on export.
2 Install and configure the plugin#
- Download FATE Blender plugin 0.0.21. It requires Blender 4.2 or later; the author reports support through 5.1. This guide was tested on 5.3.0.
- If upgrading, remove the old extension and restart Blender first, as the author recommends.
- Open Edit > Preferences > Get Extensions > Install from Disk. Select the ZIP and enable FATE Asset Creator.
- In its preferences, leave Backup Files on. Set Fate Cache Path to a new, empty test-cache folder for this exercise.
Check the cache path before exporting. The plugin clears parts of that folder even when you export elsewhere. Never point it at source assets, saves, or a mod folder. When testing in the original game later, use that installation's actual cache directory. Keep your own backups too.
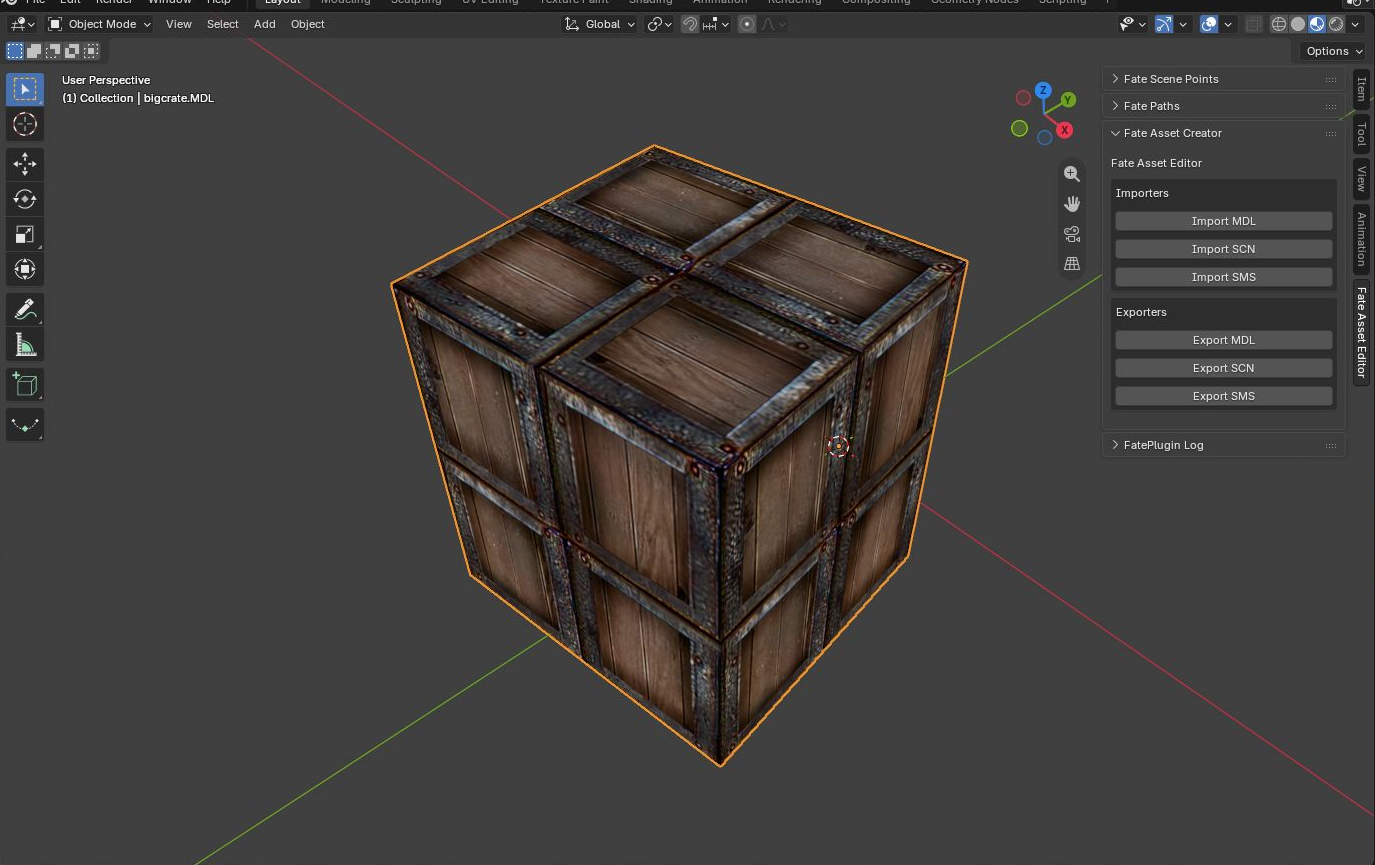
3 Import a static model#
- In the 3D Viewport, press N to open the sidebar, then select Fate Asset Editor.
- In Fate Asset Creator, choose Import MDL and open your copied model.
- Switch to Material Preview. Check the shape and texture before editing.
- Save a separate working .blend file.
4 Make a small edit#
Keep the pointer over the 3D Viewport for these shortcuts:
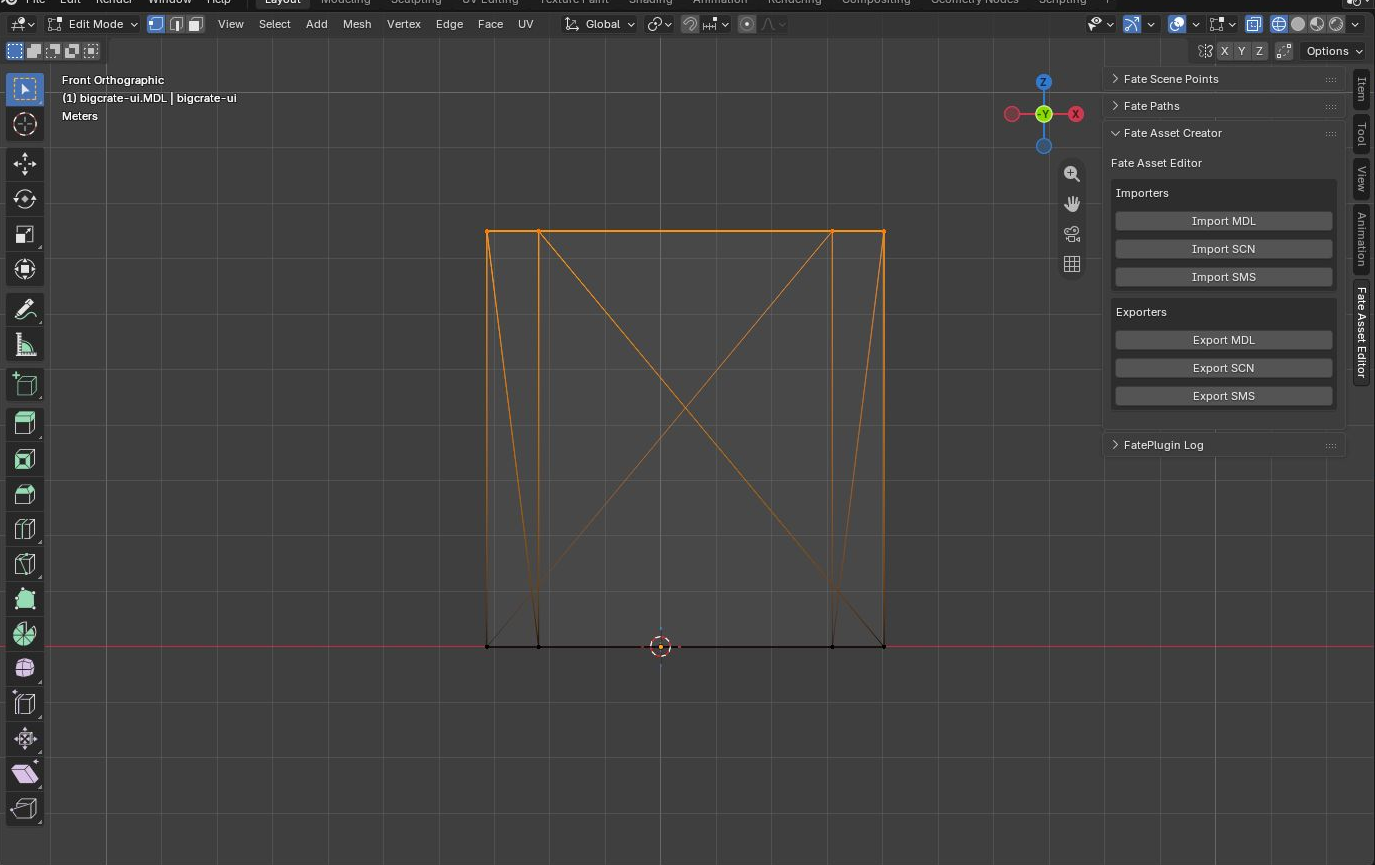
- Select the crate, press Tab for Edit Mode, and choose Vertex Select.
- Use Numpad 1, or View > Viewpoint > Front, for Front Orthographic view.
- Press Z, then W for Wireframe. Press Alt+A to deselect everything.
- Press B and box-select the top edge. Wireframe includes the back vertices too. Leave the base unselected.
- Press G, then Z, enter 0.8, and press Enter. This raises the top by about 12% of the crate's original height.
- Press Tab for Object Mode, then Z and M for Material Preview. Save the file.
Keep the origin, object transforms, UVs, and materials unchanged. For texture edits, work on a copy of the image used in the Shader Editor. Blender node effects may not export to FATE materials.
5 Export the edited MDL#
- In Object Mode, select only the crate mesh. The MDL exporter rejects multiple selected objects.
- Choose Export MDL in Fate Asset Creator.
- Choose your output folder and replace the suggested filename with bigcrate-ui.MDL. Use the uppercase .MDL suffix required by this exporter.
- Complete the export and check that both the model and crate.png were written.

Blender may suggest your .blend filename. Replace the whole name, and check that the dialog closes after export. For an installed replacement, restore the original filename and relative path.
This exporter writes mesh and material data but drops light, point, and path records. Use a simple prop for the first test.
6 Reimport and compare#
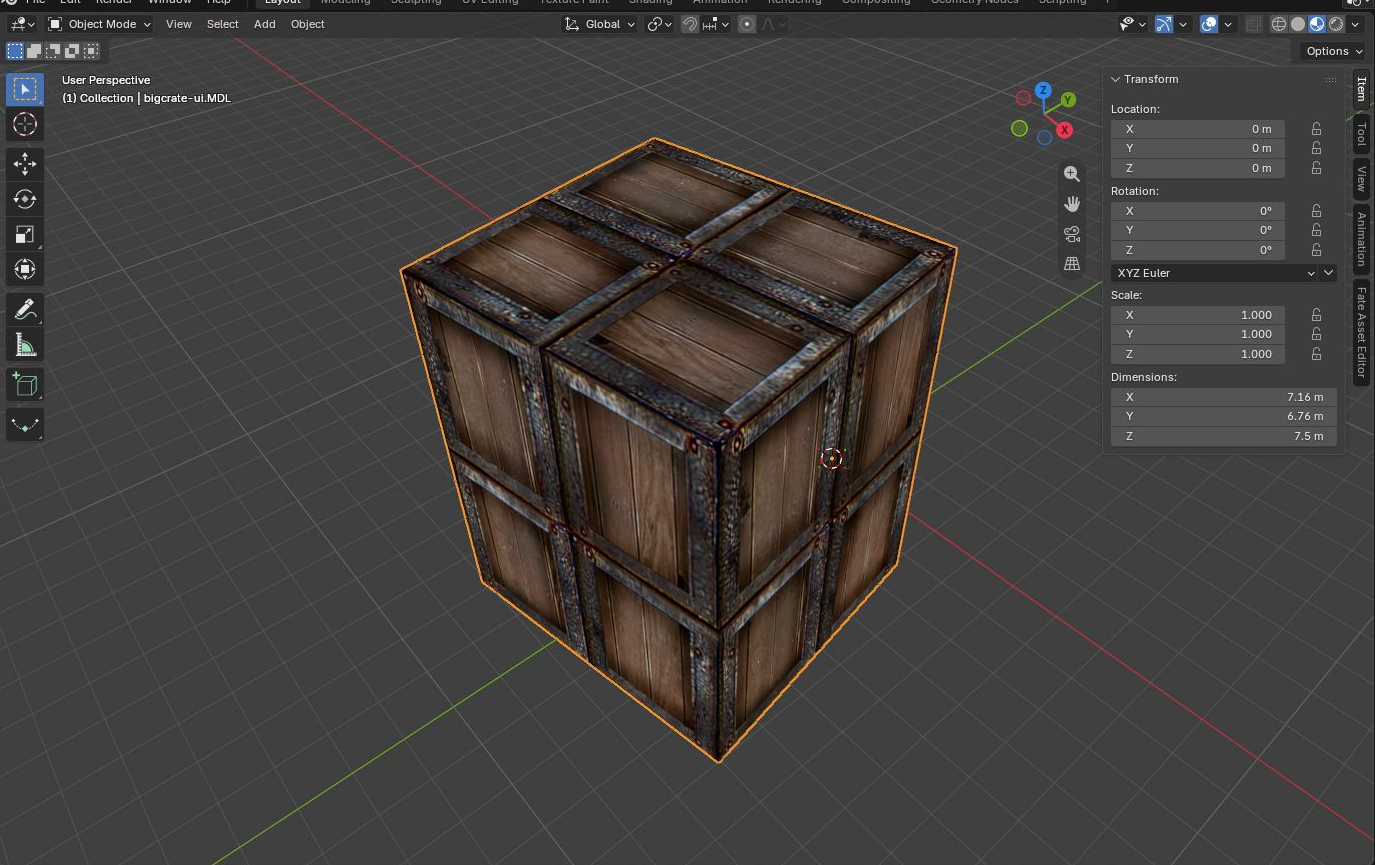
Start a new Blender session and import the exported MDL from the output folder. Keep its exported texture beside it. Check the shape, orientation, size, materials, and UVs against the reference.
A fresh session prevents Blender from reusing an old image and hiding a missing exported texture. The test crate kept its taller shape and loaded the exported texture correctly.
If something is missing or distorted, reopen your working .blend and check the selection, materials, and output files. Keep the .blend as your editable source; install the exported model in the game.
Skinned models and animations#
This example uses the original FATE bat. It has seven clips and no attachment tags. A small mesh edit and a keyed head rotation survived export and reimport. Playback and attack timing still need an in-game test.
1 Copy the complete animation set#
- Use the plugin and empty test-cache setup above. SMS export clears the configured MONSTERS cache folder.
- Copy the bat's SMS, texture, animation DAT, and referenced SMA files. Keep their names and relative layout, with separate reference and output folders.
- Start a new Blender file. Keep one animated model per file: the exporter collects all FATE-tagged actions, including those from other imported models.
The importer looks beside the SMS for animation.dat, then for the model basename followed by animation.dat. The Load Animations checkbox doesn't reliably skip loading in this version, so copy the complete set.
2 Import and check the clips#
- Open N > Fate Asset Editor > Fate Asset Creator and choose Import SMS.
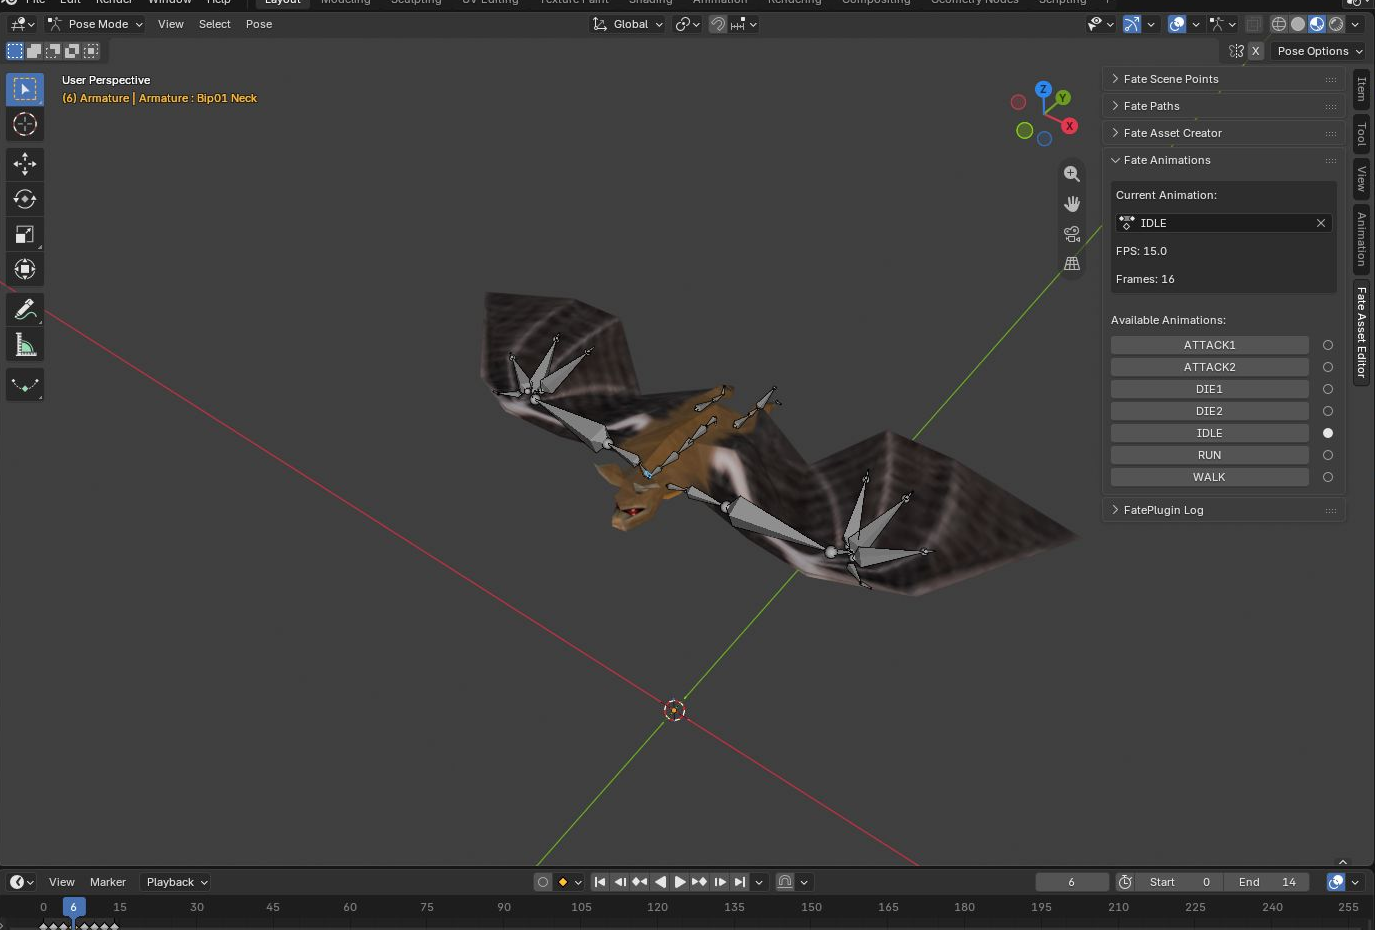
- Select the imported armature and expand Fate Animations. The panel may start collapsed.
- Try IDLE, WALK, RUN, ATTACK1, ATTACK2, DIE1, and DIE2. Scrub each clip to check the textured model. Use Home to frame it if needed.
- Check each clip's key range in the Dope Sheet or Action Editor. Set the Timeline's Start/End and Output Properties > Format > Frame Rate yourself: switching clips doesn't update them.
- Save a working .blend file.
For this bat's IDLE, preview frames 0-14 at 15 fps. The panel shows Frames 16, which isn't the last keyed frame. Other models may start their keys well above zero; use the actual range instead of shifting the keys to fit the timeline.
3 Make a small mesh and pose edit#
- Select the mesh in Object Mode. Enter Edit Mode and move a small selection of vertices. Keep the vertex groups, UVs, materials, Armature modifier, and parent relationship.
- Return to Object Mode, select the armature, choose IDLE, and switch to Pose Mode.
- Go to frame 6 and select Bip01 Head. With Global orientation, press R, Z, Z, then enter 5 and confirm. This rotates the head 5 degrees around its local Z axis.
- Hover over the Rotation fields and press I to key them. Check that the key belongs to IDLE, then scrub away and back to confirm it stays.
- Preview nearby frames and save. Keep the original bone names, hierarchy, rest pose, and weights.
A pose without a key won't survive playback or export. Preserve animation event markers, including repeated HIT markers in attacks. This exercise edits an existing rig and clip; it doesn't cover adding bones or retargeting.
4 Resolve loose-vertex export failures#
A goblin test failed with a zero-length normal / division-by-zero error caused by one unused vertex. Recalculating normals didn't fix it.
For that error, save a copy, select the mesh, enter Edit Mode, select all, and choose Mesh > Clean Up > Delete Loose. Return to Object Mode and select the armature before exporting. This fixed the test goblin without removing any triangles. Don't merge vertices or delete connected geometry as a general workaround.
5 Export the model and animations#
- In Object Mode, make the armature active. It needs its child mesh and matching Armature modifier; selecting only the mesh won't work.
- Choose Export SMS. Use an empty output folder and an explicit filename such as bat.SMS.
- Keep Model Scale at 1.00 and Export Animations checked.
- Complete the export and check the output files.
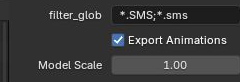
The output should include bat.SMS, bat.png, animation.dat, and one SMA for each clip. SMA filenames come from the action names, so keep the generated DAT and SMA files together. Turning Export Animations off exports only the model and texture.
6 Reimport in a fresh session#
- Start a fresh Blender session and import the exported SMS, with its generated DAT, SMA files, and texture beside it.
- Check the texture, clips, mesh edit, bone hierarchy, weights, and deformation.
- Check IDLE at frame 6 and nearby frames, then RUN and both attacks. Reset preview range and frame rate as needed, and inspect HIT markers in the Action Editor.
- Compare against your reference and edited .blend before testing in a game.
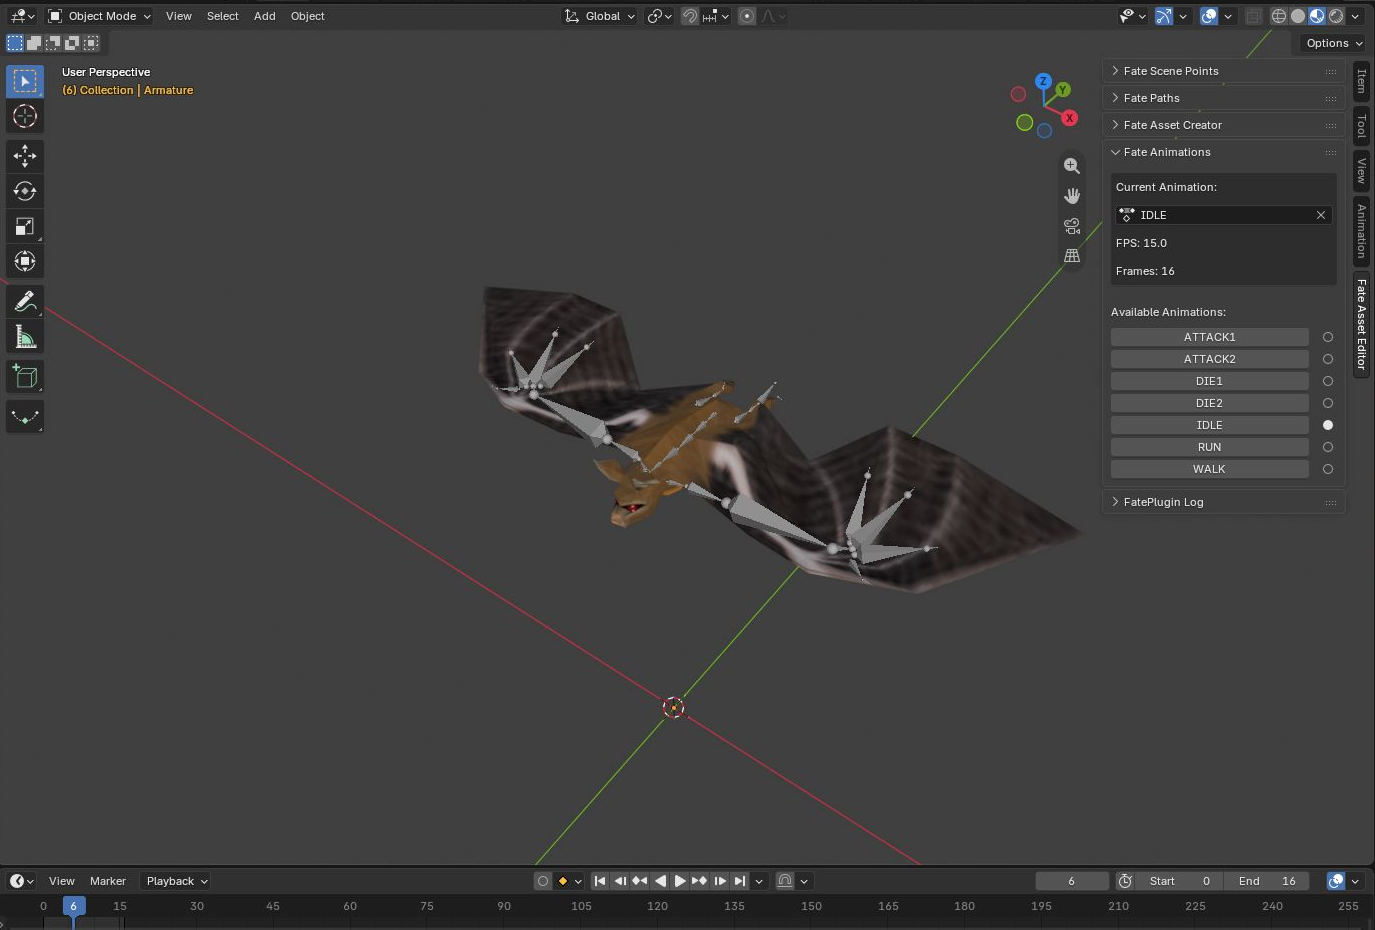
The test kept the bones, weights, clips, event markers, and intended edits. The format compresses numbers, so small differences in animated vertex positions are expected.
7 Check attachment and timing limits#
Attachment tags are lost on export. The SMS and SMA writers in 0.0.21 omit them. The test goblin lost three hand/arm attachment entries. Copying its old animation.dat won't restore those tags. Use the tag-free bat for this exercise; attachment-dependent models need a tool that preserves them.
The plugin also changes how animation timing is stored. Timing metadata survived reimport, but native playback speed and hit timing haven't been checked in-game. Test those in your intended game before distributing a replacement.
Scene models and realm helpers#
splash.SCN is the original main-menu background. This exercise edits the area where the menu character stands. The character itself isn't part of the scene mesh.
Both splash and town scenes exported and reimported, but lost materials and lighting. Use these steps to explore scene editing; plugin 0.0.21 didn't produce a faithful replacement of either scene.
1 Prepare the scene and its textures#
- Use the empty test-cache setup. SCN export clears PROPS, ITEMS, PLAYER, and TOWN below the configured cache path.
- Copy splash.SCN and all referenced textures into a working folder. Keep an untouched reference and a separate output folder.
- Check for language-specific scene variants when planning a replacement. Leave the originals untouched.
- Start a new Blender file and delete the defaults. Keep one scene per file, without unrelated objects or leftover helpers.
Keep textures beside the copied SCN, including non-PNG files. If an image is missing, fix the copied files and start the import again in a new file. Town also needs its referenced water.avi.
2 Import and locate the menu player#
- Open N > Fate Asset Editor > Fate Asset Creator > Import SCN and select splash.SCN.
- Switch to Material Preview and check the scene before editing.
- Expand Fate Scene Points and select player. This is the marker for the menu character's standing position. Keep it distinct from pet, camera, and target.
- Use View > Frame Selected or Numpad Decimal. Zoom back out from the tiny marker to see the clearing and nearby crates.
- Orbit to inspect the area and save a working .blend file.
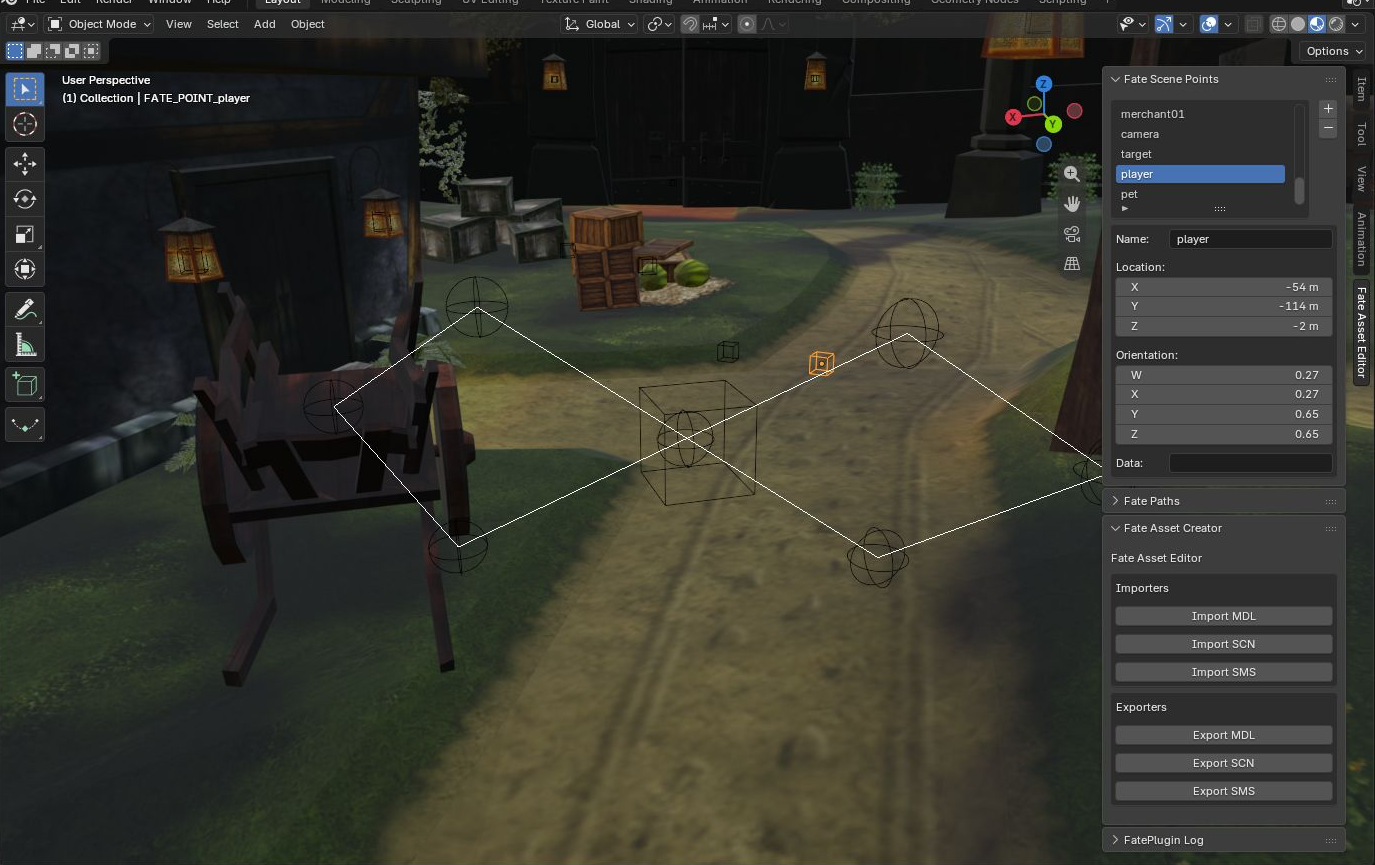
White lines and wire shapes are Blender overlays. The imported camera marker and path don't automatically recreate the game's menu camera in Blender.
3 Make a visible prop edit#
- Select the grey crate stack near the player marker. In this import it is named scene_47_26_sceneobj; the fruit display is a separate object.
- With Global orientation, press G, X, enter -2, and confirm. Leave the height, rotation, scale, and materials unchanged.
- Inspect it from several angles. Keep the standing area clear and check for overlaps. Moving the visible crate doesn't update collision.
- Save the file. Keep the full scene, including objects outside the close-up.
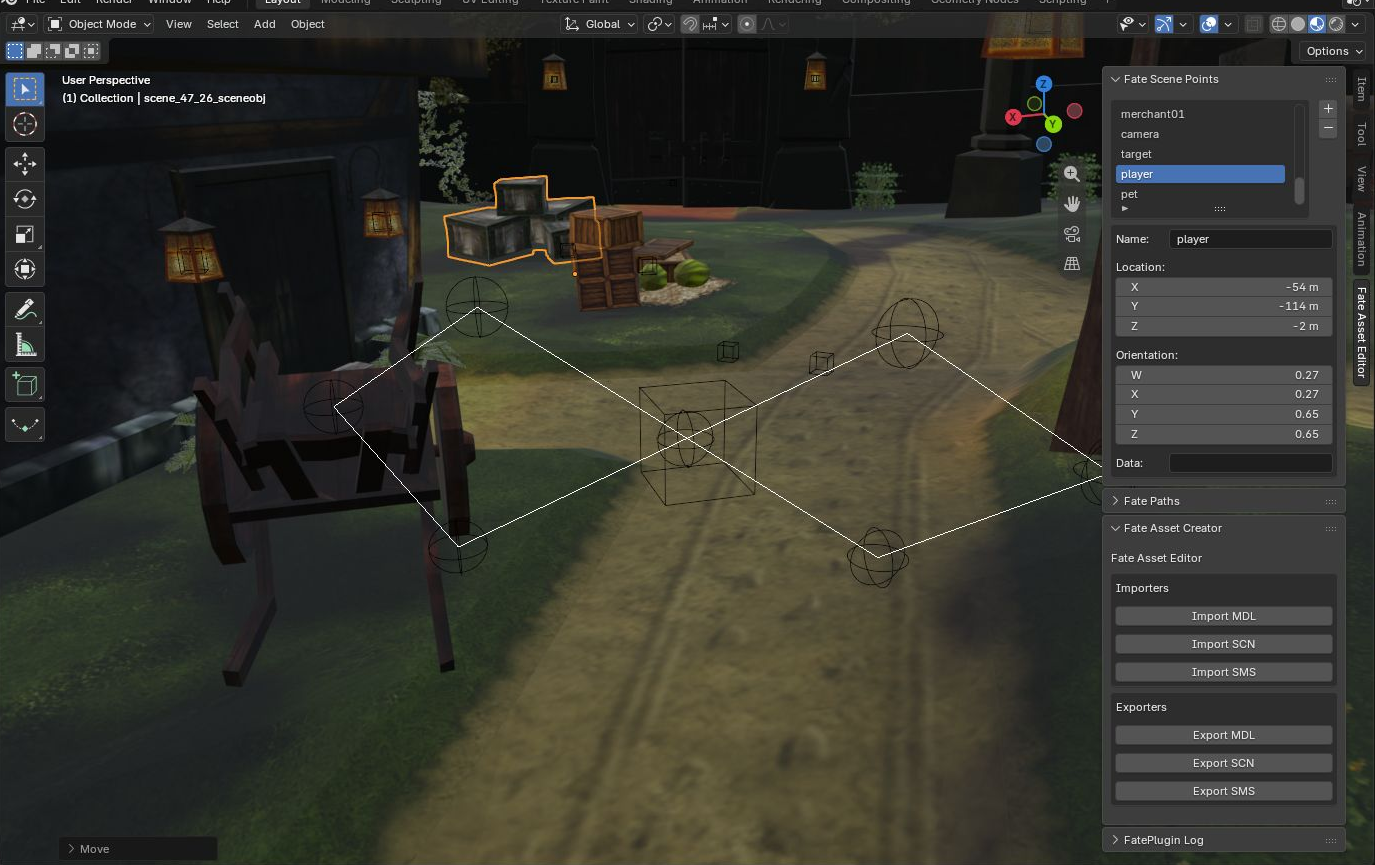
Generated object names can change on reimport because the exporter splits geometry by material. Identify the prop by its appearance as well as its name.
4 Edit registered scene helpers carefully#
Select player in Fate Scene Points and add 1 to its Location X. Keep Y, Z, orientation, and Data unchanged. The position change survived reimport.
Use the panel's Location fields for scene points. Moving only the linked empty with G doesn't update the stored position used by the exporter. The marker can also lag behind a panel edit, so check the exported point after reimport.
For camera paths, move the linked path-node empty. For lights, change the imported light's FATE properties rather than only its Blender preview brightness. A small path-node move and light-range change survived testing. The menu camera path isn't a navigation route.
5 Select and export the scene#
- Return to Object Mode and press A over the viewport to select the full imported scene, including distant meshes.
- Choose Export SCN, select your output folder, and enter splash-test.SCN with the uppercase suffix.
- Complete the export. Check that the dialog closes and the SCN and textures were written.
- Keep the exported files together for reimport; store the .blend and backups separately.

Selection controls which meshes export. Lights and registered points/paths are collected from the whole scene, even when unselected. To export a subset, use a separate working file and review its helper collections too.
6 Check external files and reimport#
- Start a fresh Blender session and import the SCN from your output folder.
- Check that textures load from the output folder and appear on the correct surfaces.
- Revisit the menu player area and compare the crate, player position, and any edited lights or path nodes.
- Compare the appearance as well as the geometry. Object and vertex counts can change when meshes split by material.
Town's exporter wrote water.avi.png while the scene still referenced water.avi. Copying the original working-copy water.avi into the output folder fixed reimport. Renaming a PNG to .avi won't work. Animated-water playback wasn't tested in-game.
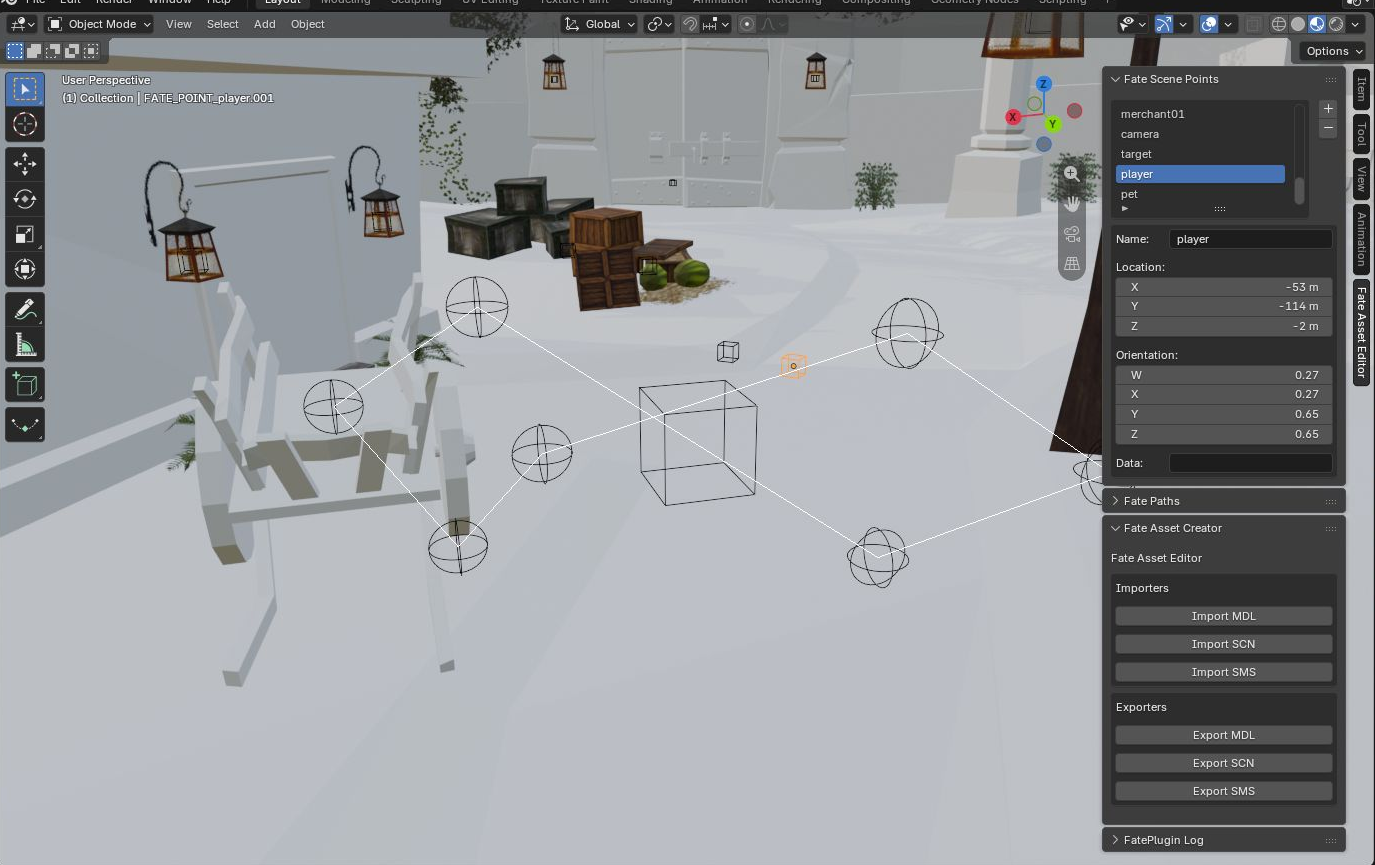
The crate and helper edits survived, but the scene's materials didn't, as shown below.
7 Recognize the scene export limits#
The pale surfaces above are an export problem. In plugin 0.0.21, testing found:
- Lost lightmaps, shadows, and vertex colors.
- Missing or changed surface texture assignments.
- Changed town light types and directions.
- Scene scale, fog, and ambient settings replaced with fixed values.
- A changed path representation, although the tested path positions survived.
There isn't a verified setting that fixes these losses. Keep the original scenes in use. Scene exports also don't update separate collision files, navigation, quests, or menu-camera behavior. Neither test scene was installed into a game.
Reborn's Blender and GLB guide covers its newer workflow and current limits. For older 3ds Max techniques, see helper points and texture baking.
Package and test#
For Reborn, place compatible replacements at their original game-relative paths inside your mod's content folder. Follow FATE DAT modding for the manifest and installation. Add a DAT change if you change data or a referenced filename.
The plugin exercises above check Blender export and reimport. They don't confirm that the edited crate, bat, or scene works in Reborn 0.3.0. The Buckler GLB walkthrough is the model replacement checked in the released game.
For original FATE, follow that game's installation requirements. Reborn's mod.json and model_overrides don't apply there.
Install the exported model and required textures, then test on a disposable character or copied save. Check the edit, materials, orientation, attachments, and dropped/equipped appearance where relevant. Restart between file changes. Disable the mod or restore backups if anything is wrong.
Keep .blend files and experiments out of the release. A newly named model also needs a data reference before it will appear in-game. Share only files you have permission to distribute.
Sources and verification#
Plugin by yhannatheundying. See the 0.0.21 documentation ↗ and source repository ↗ for its implementation and release notes.
The crate, bat, goblin, splash, and town tests used Blender 5.3.0 on Windows with plugin 0.0.21 on 18 November 2026. They covered editing, export, and fresh-session reimport. They don't confirm every plugin feature or in-game compatibility.
Screenshots show the plugin and original FATE assets for instruction. Original artwork belongs to its respective rights holders.
No chapters match that search. Try a different word or clear the search.